A Show

On Saturday Creating Space are having a show! I’ve been thinking about how to display my creations, and it’s not easy! Difficulties to overcome include hanging stuff on walls that are solid painted brick (I’ve decided I’m not going to), and showing a process for the things I make.

I’ve been shaking out shawls and examining skeins of handspun yarn. I’ve bought some thin ribbon that I’ll use for ties on my skeins (I’ll be rewinding them so they look neat) and I need some fabric for a table cover (I’m sure I have something suitable in my stash – at least I hope so!)

Harriette will be coming out this Saturday and will be modelling one of my shawls (probably the time travelling shawl). She’s really excited to be having an outing. However, I’m not sure she’s going to approve of travelling in the boot of my car (I’ve not told her yet).

I’ve also decided to get some photos printed, these I’ll put onto 12×12 inch cards and show them in an album with short descriptions. These photos will include flower pictures, processes and creations I no longer own. Here’s a collage of the pictures I’ve chosen.

Photo Collage

I’ll be able to pick the photos up tomorrow (I hope).  I had a minor problem when I looked through the photos I’d originally sent. I realised I’d not understood the format requirements and submitted photos of a poor quality. Fortunately I was able to phone the company in the morning and they were happy to cancel the order I’d placed online and accept a new order from me. If I’m happy with the photos when I get them tomorrow, they will probably have a customer for life!  I’ll have a busy evening tomorrow collating the photos! I feel like I’m recreating my blog, but in real life!

Touring

I’m having a great time taking part in the Tour of British Fleece that is happening at the same time as the Tour of Britain. Prior to the tour I gathered my supplies and thought about what I wanted to spin for, how much I needed for that project, and whether I wanted to dye the wool or keep it natural. I decided on a little colour:

Dyed Fibre

After 7 days of spinning (I missed yesterday, but caught up with a long spinning session today) I have 3 full or partially full bobbins. Here you can see the middle of the rainbow:

Bobbins

Tomorrow I’ll spin the Romney to complete the first set of singles for this project. Over the next few weeks I’ll spin at a more gentle pace and complete the second set of singles before plying and being able to reveal the results!

Preparation

I’ve been diving through my stash in preparation for the Tour of British Fleece which starts on Sunday. I’ve think I’ve got all my fibre together (with the exception of some Teeswater locks that I’d like to use but are currently in the bottom box of a five deep stack of 64 litre boxes – with other craft supplies topping off the stack). I’m considering my spinning plan and contemplating dyeing the fibre prior to spinning it. I’m also wondering what I shall make from this yarn (at the moment a caplet is my top thought).

The picture shows the supplies I’ve gathered so far, some from my stash and some I’ve purchased specifically. I won’t be using all this (I have multiple bags for Suffolk, Jacob and BFL ) I just need to decide which I’m using and how much of each. There is also a bag of dyed Leicester Longwool locks, but I’m not going to use them (please pretend they are the missing Teeswater in a different colour).

stash

My running order at the moment is:

Stage Date Fibre
1 Sunday 6th Black Welsh
2 Monday 7th Blue Faced Leicester
3 Tuesday 8th Cheviot
4 Wednesday 9th Jacob
5 Thursday 10th Teeswater with BFL
6 Friday 11th Whitefaced Woodland
7 Saturday 12th Suffolk
8 Sunday 13th Romney

I won’t be able to spin all the fibre for a caplet in one week – but I have a plan (sort of)!

The importance of grip and slip

When I was first learning to spin I couldn’t understand where grooves and whorls on the wheel needed to be smooth and where they needed to have a good grip. I assumed (wrongly) that all places where there were drive bands and brake bands should be unpolished. Worse, when I was cleaning my wheels I didn’t take enough care about keeping polish from these places.

During the TdF I was using one of my Ashford traditional wheels with the sliding hook flyer. This was the second wheel I bought, and the flyer was the first wheel upgrade I purchased (at the height of my ignorance on whorls and grooves).

When plying the two skeins during the tour I struggled a little with the wheel during the last few yards, but not enough to worry about it. However, when I plied the most recent skein the wheel was almost impossible to use. I couldn’t get a good balance between twist (from the drive band) and pull-on (from the brake band). I changed the drive band about 4 times (trying different materials: cotton string, cotton weaving yarn and pony band lacing) and I also changed the brake band. I applied copious amounts of spinning oil. However, the wheel was still extremely difficult to use and was making the most appalling screeching noise – it sounded like a drill. In the end I carried on regardless (extremely glad there was no-one in the house except me that night to hear the noise).

Sadly the fight with the wheel shows in the resulting skein – which is unevenly and generally under plied (with some sections being particularly poor). I will have to run the yarn back through the wheel to correct this.

A couple of days ago I started correcting the problems with the wheel. The wheel uses scotch tension so the brake band runs over a groove in the bobbin. It’s fairly common to use a nylon line (like fishing line), though I’m not fond of this, and having got used to using a mercerised cotton thread (like thin crochet thread) I prefer this. Because this is the brake band the first thought is that the groove should have a good grip. In fact the groove should be fairly polished and run smoothly under the brake band. Any roughness may cause the band to catch and the bobbin to run jerkily, or make it difficult to apply a little more pressure to slow the bobbin down, without it gripping completely and stopping it in its tracks. So I’ve carefully sanded (with a fine sandpaper) the grooves at the end of the troublesome bobbin, and applied a wax polish (ideally I should use an oil finish, and may do so in the future) repeating until they were smooth. I shall do the same with the other bobbins in due course.

The groove in the drive wheel was feeling very smooth so I’ve gone around this with a coarse sandpaper to increase the grip. I’ve done the same with the whorls on the flyer. The smallest gives a ratio of close to 20:1 which means there is very little surface area available so a good grip is essential. I’ve seen rosin (as used on bows of violins and other string instruments) suggested to improve the grip of drive bands on wheels, so I shall investigate this if I have any further problems.

I’m happy that I’ve fixed the problem, but the proof of the pudding is in the eating (a picture of the skein will follow when I’ve properly tested the wheel and corrected the plying problems).

Should you be reading this as someone who is learning to spin and trying to get their wheel functioning properly – here’s the short version (for a scotch tension wheel): The groove(s) on the bobbin should be smooth (sanded and polished). The groove in the drive wheel and the grooves for the whorls on the flyer should be grippy (no polish).

Cycling and Spinning

This year’s Tour de France finished last Sunday – as did the Tour de Fleece.  However, I finished on Monday at the back of the peloton having missed a day’s spinning in the final week.

By the end of the tour I’d finished two 100g skeins and spun a further 75g of singles.  Most of the spinning was done on my oldest Ashford Traditional (which at some point I appear to have named Twiggy – as she is a 1960’s model) with the lace flyer.

basket

So far my colour experiment hasn’t produced a range of browns, instead my skeins are blues and pinks, greens and purples.  I’m looking forward to seeing the result of plying the last pair of colours together.

skeins

I’ve still got 300g of fibre to spin for this project, and when the spinning is completed I hope to use all six skeins to Tunisian crochet a shawl.

I’d like to get the spinning finished over the summer, because at the start of September it’s the Tour of Britain and in another moment of madness I’ve agreed to spin during each day of that race too (it’s 8 stages from 6th to 13th September)!

In between the spinning I’ve managed a couple of walks, one to admire a setting sun and another to enjoy the sunshine after a few cool grey days.

sunset

water

Yarn on the Tour de Fleece

So far I’ve spun everyday of the tour, with the exception of Friday (when at 11pm I realised I was completely exhausted and went to bed). To make up for this, I spun the following Monday, instead of taking the official rest day. On Saturday I had a lovely long spin as I took my Traddy out for the day (it’s rare that it has a day out and I do think it enjoys the change of scene!)

I’ve spun up half of each of the first two braids of fibre and plied them together. And the resulting skein looks lovely.

singles
The first singles ready to be plied
drying
The first finished skein drying in the sun today.

However, having completed the first skein, I’m not sure I really want another 300g of the same colours.  So in a moment of madness I’ve added in some green/blue tops in colourway Calypso on Polworth fibre (also part of the three month fibre club I joined last year).  I’m now going to have a mix and match spinning project.

All three colours
All three colours

I’ve got two braids in each of three colourways.  One braid in each colourway is being split into two, spun then plied with each of the other two colourways. This will result in three 100g skeins of barber pole yarn.

The remaining 3 braids will be spun and plied with themselves, either using a fractal spinning technique, or, at the other extreme, spinning and plying to maintain the colour changes in the braids (I have yet to decide – but whatever I do will be done to all three colours).

The result will be six skeins of 2 ply yarn, each skein completely unique, but related to most of the other skeins. However, this is 600g of spinning, so I don’t expect to finish during the TdF.

More singles
I shall be plying these together shortly. Is it madness? Will I end up with shades of brown?

I’m not sure what project I will use these yarns for. I’m sure I’ll think of something!

Tour de Fleece – the first stage

Yesterday saw the start of the Tour de France. It also saw the start of the Tour de Fleece and I’m spinning for the Lovers of Ashford UK team on Ravelry. My challenge this year is straight forward, I have four braids in two colourways that I’m going to spin and (probably) ply together (that’s 400g of fibre). Knowing that it’s taken me months to spin just two braids in the past, I think spinning the 400g by the end of the tour will be quite a challenge.

braids

The fibre is all dyed by Sara Texture Crafts and is in the colourways Rosemoor (on BFL) and Fruit Punch (on Falkland).  On Friday evening I gave the wheel I’m using (my oldest Ashford traditional with a lace flyer) a polish and oiled all the moving parts all ready to begin on Saturday.

Yesterday evening I sat out on the patio for a few minutes spinning. It was lovely, but the light was already failing so I retired indoors. I put on an audio book (my mum lent me a couple to try a few months ago, as she thinks I’ll enjoy audio books, but I had a poor one a few years ago and haven’t tried since) So I listened to David Tennant reading a Doctor Who story (I’m afraid I laughed at his rendition of Rose’s mum, but otherwise I’m enjoying the story), and spun up quite a lot of my first half braid.

basket

I’m spinning S-wise (anti-clockwise) with crochet in mind. It’ll probably be Tunisian crochet (which I enjoy working but don’t do enough). But Tunisian crochet may be too busy a stitch for the finished yarn, so it may be normal crochet.

single

Last night I thought to make the perfect spinning date I just needed to add a lovely box of chocolates to nibble on, while listening to David Tennant reading and working through my spinning. (I may treat myself to some chocolates for tonight).


Part II

For the last few days I’ve been keeping an eye on the entrance of the hive. There have been bees flying in and out, but I’ve not been happy with the numbers. This evening I managed to get out to the hive to check things over, with the intention of adding the necessary frames and giving the bees a feed.

I smoked the entrance, waited a few minutes, opened it up and…

Sadly no bees. I’m disappointed but not entirely surprised (things didn’t feel right at the hive). I’m also disappointed in myself because my failed attempt at homing the bees has resulted in the bees reswarming and perhaps finding an unsuitable home or at least causing a nuisance to others.

The accidental beekeeper

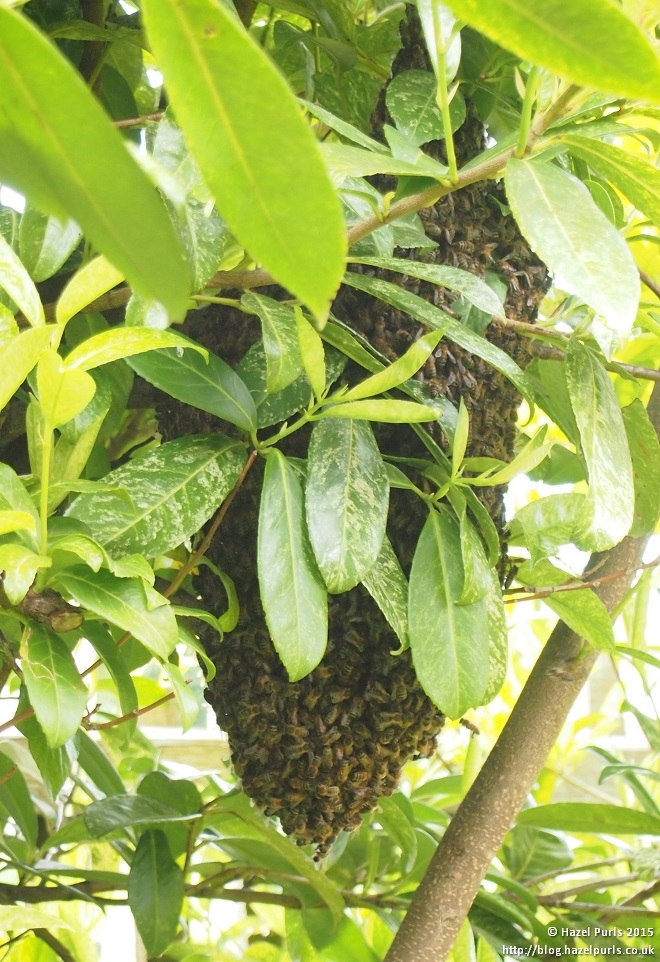
In the last few days I’ve been plunged back into the world of beekeeping. I arrived home after a day’s shopping to a note on the driveway warning me that there was a swarm of bees in my garden. Initially I couldn’t see them and felt disappointed that I had missed them. Then I looked again and saw a large cluster hanging down from the branches of a bush.

Swarm

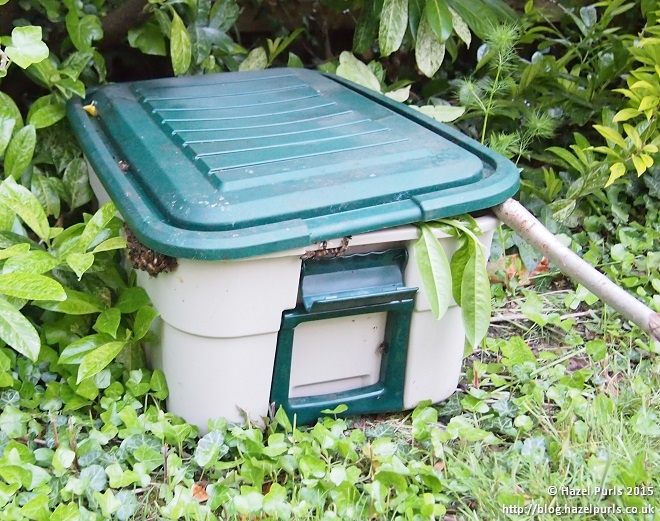
I got in and spent a bit of time trying to get hold of a beekeeper to collect the swarm. However, as it was the Sunday of a bank holiday weekend I had no luck. In the end I found my bee suit (magically I knew where it was and it wasn’t in the loft!) and went hunting for a suitable “skep” to catch the bees in. Sadly I don’t own a skep but I did find a large plastic lidded box.

The actual swarm collection process was straight forward. The bees were easy to reach and calm. I placed the box on the ground under the cluster and cut off the branches the bees were hanging on – dropping them into the box (in hindsight I probably should have knocked the branches to get the bees to drop off, rather than cutting the branches – as the foliage left in with the bees caused problems later on).

Once the bees were in the box I dropped the lid on top – leaving it slightly skewed to allow any flying bees to enter. I then retreated to the back garden to check if I had any bees hanging onto me – no bees – so I was able to go inside and get ready to go out. 15 minutes later the bees in the front garden were calm enough that I could walk out of the front door without any problems. Two hours later I got home and was able to adjust the lid of the hive – leaving it propped slightly open to allow bees to fly in and out.

Bees in box

All night I could hear the bees buzzing in their temporary home…

So far so good.

By the following day I’d decided I’d like to keep the bees. So Monday was spent getting some essential equipment (a floor for the hive, foundation sheets of wax and frames) obtaining an electric heat gun, and clearing a part of the garden from brambles. There was a short break while I picked up my children from their weekend away, then I cleaned the old equipment (including sterilising it by scorching with the heat gun). In the evening I put the lid down on the box with the bees and transferred it to the back garden. I was unsure that the lid was fitting snugly on the box and that there wasn’t a small gap that bees could escape from (there was some foliage sticking out of the box). I also built some frames, but I was too tired by this stage to build all the frames so I only managed 5 of the 11 needed. I collapsed in bed at 2am.

Tuesday started early by donning the bee suit, finding a level surface in my newly cleared “apiary” to site the hive, putting the hive in place and finding a board and a sheet. I propped the board up at the front of the hive to make an entrance ramp, and put the sheet over this. I then opened up the bee-box and dumped the bees out onto the ramp. I have to be honest here and say I really dislike doing this. One moment there is a nicely contained box of bees, the next there are bees everywhere. I watched for a bit – they didn’t really seem to want to walk up the ramp to go to their new home – and then I retreated. When I checked at the front of the house I found that a large number of bees had congregated at their previous location – there were now a good number of bees flying around and looking lost right by the edge of my garden – next to the pavement! I’d placed a small box at the front, just in case, and the bees were investigating it (but not finding the queen anywhere). I put a couple of notes out warning passers by about the bees.

Over the course of the next few hours I went out a number of times to try and get the bees to go into the hive. I removed the vegetation that had been dropped into the box with the bees, as the bees were clustering around this. I removed the sheet, which seemed to be hindering and not helping (shaking the bees onto the ramp). At one stage I realised that the bees perhaps did not like the open mesh floor in the hive and so were avoiding it. This was easily solved by putting in the little draw that came with the floor1. At about this time I retrieved the bees that were in the small box in the front garden and added them back to the swarm in the back. The next time I checked the bees they were still ignoring the hive, but had formed an enormous cluster underneath the board. I swapped the board with another one I happened to have and shook the bees from the old ramp onto the new one. They started to walk up to the hive, then decided to walk to the bottom of the ramp and congregate there. I went back inside at this point despairing that they would ever go in the hive.

During this time I’d been exchanging emails with a friend about the bees and she enquired how they were doing – and I had to say they weren’t going in. I then went out and looked – and they were all gone! Did they go in the hive – or were they so fed-up of my homing attempts that they’ve gone to find another place to live? I hope they finally went in and are settling down. There were bees coming in and out, but not as many as I would have liked to see. In a few days I’ll add the missing frames and check. In the meantime I’ll watch the entrance and see how busy the bees are.

Hive

(Please ignore the mess beyond the hive – on Monday morning this area and the greenhouse behind couldn’t be accessed or seen because of the covering of brambles)

So, 9 years after stopping beekeeping (because of pregnancy and children) I’m embarking once again on this pastime. The children are fascinated! They were well behaved while I kept disappearing off down the garden in my bee suit (it’s half term so they were at home). My son got very good at checking me over for clinging bees before I came inside. And after all the excitement they sat and helped me make up some of the missing frames.

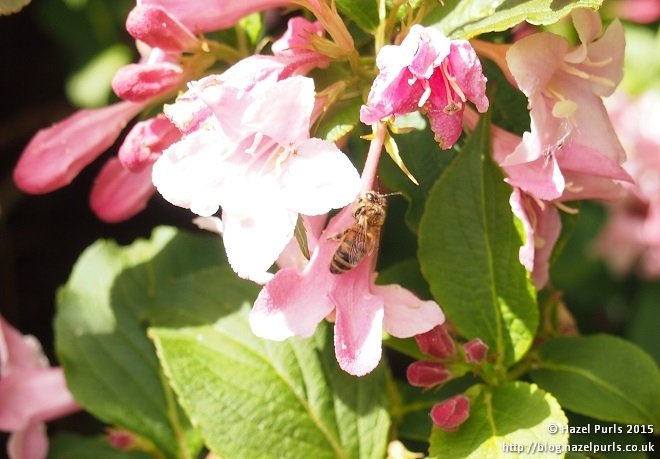
I’m now thinking hard about flowers that are in the garden (including wild flowers) or that I should add that are suitable for the bees.

Wild flower

Heartease

Bee gathering nectar

1 The Open mesh floor (OMF) is used to help with varroa control (varroa being a mite that badly affects bees and needs active control). Mites periodically fall off bees. If they land on the floor of the hive they can reinfect a bee. However, if the floor is a mesh the mite falls out of the bottom of the hive and can’t reinfect a bee. The draw is there so that mite levels can be monitored by counting how many mites have fallen off bees. The OMF helps to control mite levels but isn’t an effective treatment or control without other measures also being used.

One, Two, Three, Four!

Harriette has been complaining that she’s not been doing any modelling work. In fact it’s so long since she last modelled anything that she’s forgotten when she last did some. She’s currently stood in my study with some hand-dyed skeins of yarn draped around her and she says that I should either do something with them or put them away as she’s not a hat stand (technically she’s a clothes stand – shush, best not tell her).

Sadly I didn’t think to cater to Harriette’s aspirations when taking pictures of my first object. I think I was too busy making patterns with it! It’s a scarf and I finished it in the run up to Christmas.

scarf-folds

scarf-side

scarf-roll

scarf-ends

The yarn is handspun blue faced Leicester and bamboo that I carded into batts to make a gradient coreless core-spun yarn.

Over the Christmas/New Year period I finished plying some polworth yarn. I threaded both plies with beads and used the intermittent coils technique I learnt on Sarah Anderson’s course. My coils improved as I went along (my hands got better at controlling and moving the twist and coordinating with my feet!) but when I do another intermittent coiled yarn I’ll put more twist into the singles. I haven’t yet decided on a destination for this, or what technique I’ll use for it.

coils

During the summer I spun up some alpaca and bfl. In October I started spinning up some merino and seacell and last week I finally finished the spinning and started plying them together. Even at the last moment I wasn’t sure that plying them together was the thing to do, but as the colours have gone onto the bobbin I’ve been pleased with the result. I’m surprised that two very strongly coloured singles are making a paler more subtle plied yarn. I’m interested to see what the finished skeins will be like.

basket

abms-plying

Finally, I’m still working on the knitted shawl it’s been quite a few places with me, including a beach at the end of October while the children dug big holes in the sand.

sandyshawl

While at the beach I took the opportunity of going for an early morning walk and taking some photos. Here’s sun, sea and sand just after dawn:

sun and sea

sandysun

Harriette is really keen that I finish the shawl soon, so we can go outside for a bit and get some nice photos that include her. She’s hoping to see some daffodils.